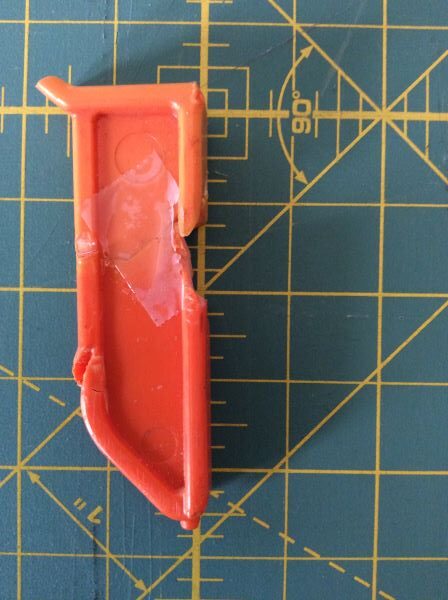
Last year Brian ran over the starter pin/key for our Remington electric lawn mower with… the lawn mower. I did not remember this until… I wanted to mow the lawn. After searching for a replacement and getting nowhere, I glued what was left of our mangled key back together.
Aside from wanting to keep the machine going from an environmental perspective, the mower was a housewarming gift from my parents. It was 2008 and we were so excited to have it, I made a thank you video.
As I tried to clamp the unclampable broken key, I thought of Bron Zeage of the Secret Underground Laboratory Recovery and Salvage, and I thought of Colin Knecht of WoodWorkWeb. Those guys can clamp anything. I thought about IQ tests. They should include a clamping challenge. I thought about how you have to see a lot of clamping solutions multiple times before any of them would ever naturally present themselves to you in a pinch. As such, I resorted to taping the glued joint, an idea I took from YouTube videos about fixing ceramics. It felt like giving up. But it worked.
Before trying to use my newly glued key and possibly damaging it even more, my friend Craig suggested that I document the dimensions. It was a good idea, as the key no longer easily slid into the keyhole. Ultimately, it did not work. And until I figured out why, it would be pointless to ask my neighbor to print me a new key using his 3D printer. Maybe someone already posted a design on ThingiVerse.com? No such luck. Maybe someone had one I could borrow now that Sear’s didn’t make the part anymore? My post received no bites on FreeCycle. And on FaceBook, I could not get past the various pop-up privacy statements (which I assume went something like, “Screw you!”) to post anything there. I checked eBay, CraigsList, Parts Select and came up with zip.
Alternatively, Craig suggested that it might be possible to circumvent the need for a key by adding a toggle switch. He said this like knowing how a light switch works is common knowledge, which made me think that it should be (along with being able to tie a boat to the top of a car and any number of clamping challenges). With instructions to send Craig a picture of the lawn mower so that he could further assess the problem and help me, I went out to the garage with my camera/iPad. And then, seeing the three screws that keep the “key box” together, I became hopeful that a solution would be obvious once I took the thing apart.
Nothing was obvious (including the disassembly). The screws that I removed were deep inside a channel. I worried that it would be impossible to put them back.
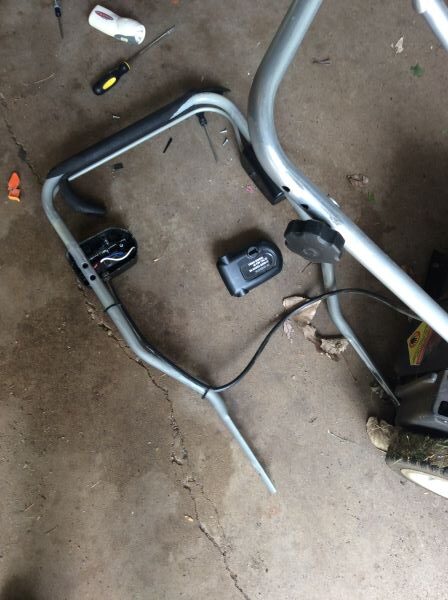
After discussing the mower with Brian over lunch, we decided to take it to a repair shop. We were about to load it into the back of my Mazda when inspiration struck. As I was telling Brian about how the key mechanism confused me, it dawned on me how the thing worked. This is not the first time that an answer revealed itself as I tried to explain a problem to Brian. For some reason, just his standing there while I’m fiddling with something can induce insight. Though other times, I need a ton of space to think. It’s on him to know the difference.
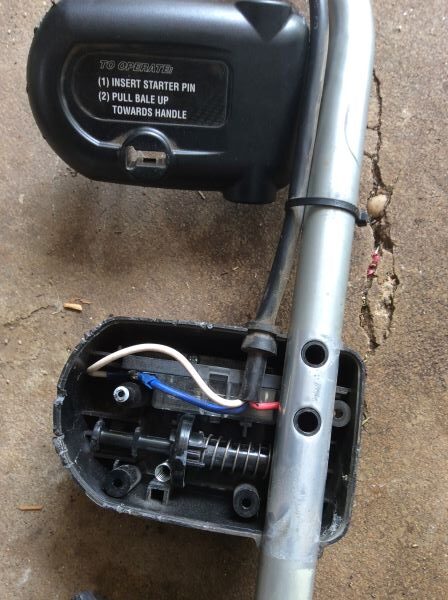
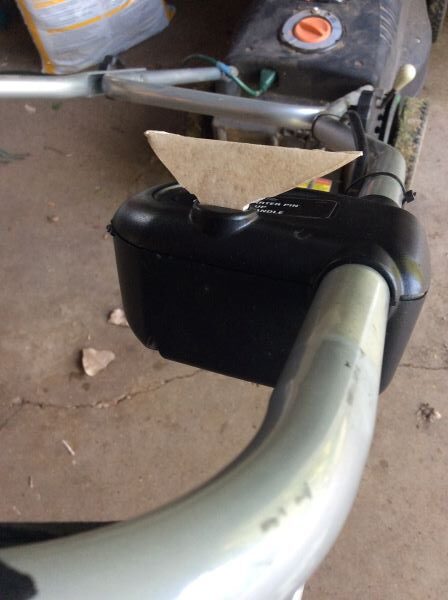
When the key is inserted, its 45° angle at the tip pushes over a disk that is on a shaft with a spring. This places the disk over a button on a switch box. When the lever on the lawn mower handle is pulled up at the same time the key is in place (and the disk is over the button), it makes the disk rotate. This depresses the button on the switch box. I will call this a “floating” button because there must be pressure on it for it to be engaged, as opposed to a button that remains depressed after pressing it. Once the mower starts, the key pops out with the force of a small spring. Sometimes the key pops out with such force that it lands on the ground and if you don’t notice, you might run over it.
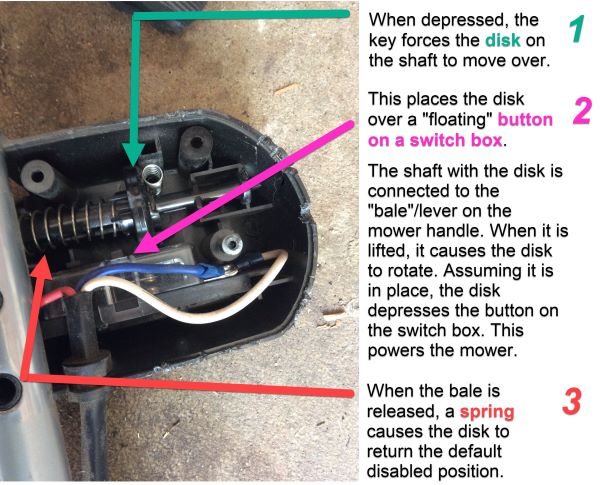
This kind of ingenuity cheers me up. Marvelous, isn’t it? Likewise, the oversight is amusing. Whatever happened to a hole and some string? Why not attach the key to the mower? That way it would be unlikely that a person would ever lose or damage it.
Many of the measurements I took of the key turned out to be unnecessary. However, knowing the rough shape and size of the original key was critical. And I would need to remember that the 45° angle on the key must face the disk. This requirement probably explains the shape of the key that forces it to be inserted in the right direction. Making a new key should be simple. I thought about using wood. Ultimately, I used vinyl. Two layers of tiles with adhesive were rigid and about the perfect thickness. It was also relatively easy to cut with an X-Acto knife, making easy work of any fine tuning that would be needed.
The vinyl pieces I used came to me via FreeCycle.org. I had an idea for how I might use a case of them but then changed my mind. So, I took the tiles to ReStore, which is a second-hand building supply center affiliated with Habitat for Humanity. When I discovered that I had missed a few, it was annoying because it seemed unlikely that I could reunite the spare pieces with the larger group and they were probably useless on their own. And now they were taking up room in my garage. Who knew that I would be making a lawn mower key out of them years later? Or that it would feel like a privilege to have such junk at my disposal? It’s just too bad that it didn’t work.
Getting the disk to line up over the button on the switch box was fussy. I feared that I had messed something up when I took the thing apart (Is this a good time to mention the “spare pieces?”). So, I went inside to watch some YouTube videos about how to install a toggle switch. I had settled on a solution. I would install a big red button on the mower. Huge! And then I would put on a red plastic nose, the big shoes, striped jumpsuit, wig, the works. And then, dressed like a clown, I’d mow the lawn. We would become known as those people who rarely mow the lawn. But when they do, wow. What a show.
And then my dad called.
When my mom mentioned the key fiasco — something I must have told her about when I called to celebrate a Timberwolves victory — my dad had some suggestions. And he made me think that I should try my “vinyl key” again, even though it seemed futile. I went back to the garage. This time, instead of trying to hold things together by hand as I tested the key, I enlisted Brian’s help and took the time to screw the “key box” back together. There was no problem getting the screws back into that deep channel where it’s impossible to see. Once inside, the design forces the screw to go in straight (This was not the case with a similar design on a fan I took apart to clean. The channel wasn’t narrow enough to keep the screw straight.) When Brian pulled up on the bale, I was surprised when the mower revved up. We tested it again. Still worked. Again? Still? Brian mowed the yard. No problem. There. I fixed it.
Because the key is a tight fit, it’s permanent; the spring cannot eject it. Should I pull it apart and do some more fine tuning? Maybe. But I’m nervous about fussing with it. Let’s call it done.
Hopefully, we can get another decade out of our mower. After I re-wrap the handle with some leftover tennis racket tape, get the blade sharpened and eventually make one more repair that I’m saving for my friend Craig, it might be possible. After all, my dad is still nursing along his riding lawn mower, which he has had for 35 years.
That was a pretty cleaver fix. These days when I take something apart I often have a couple of extra pieces laying around when finished
Having a digital camera to take pictures of things before taking them apart is so useful. I just have to remember to do it before things get confusing.