Category Archives: Repairs, Improvements, Solutions

How to Replace a Lost Lawn Mower Key

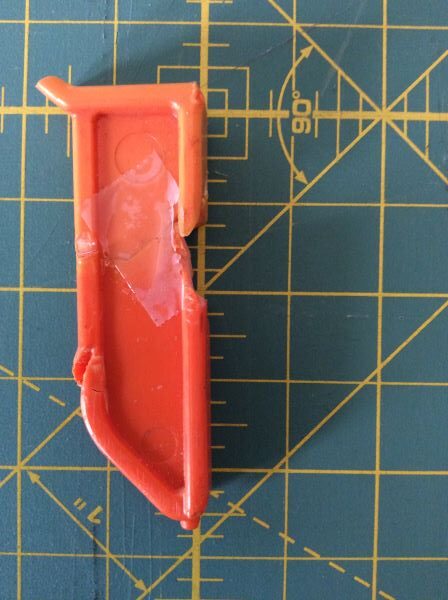
Last year Brian ran over the starter pin/key for our Remington electric lawn mower with… the lawn mower. I did not remember this until… I wanted to mow the lawn. After searching for a replacement and getting nowhere, I glued what was left of our mangled key back together.

Lawn Mower Key glued back together
I took a lot of pictures and measurements of the key that turned out to be mostly unnecessary.

Aside from wanting to keep the machine going from an environmental perspective, the mower was a housewarming gift from my parents. It was 2008 and we were so excited to have it, I made a thank you video.

As I tried to clamp the unclampable broken key, I thought of Bron Zeage of the Secret Underground Laboratory Recovery and Salvage, and I thought of Colin Knecht of WoodWorkWeb. Those guys can clamp anything. I thought about IQ tests. They should include a clamping challenge. I thought about how you have to see a lot of clamping solutions multiple times before any of them would ever naturally present themselves to you in a pinch. As such, I resorted to taping the glued joint, an idea I took from YouTube videos about fixing ceramics. It felt like giving up. But it worked.

Before trying to use my newly glued key and possibly damaging it even more, my friend Craig suggested that I document the dimensions. It was a good idea, as the key no longer easily slid into the keyhole. Ultimately, it did not work. And until I figured out why, it would be pointless to ask my neighbor to print me a new key using his 3D printer. Maybe someone already posted a design on ThingiVerse.com? No such luck. Maybe someone had one I could borrow now that Sear’s didn’t make the part anymore? My post received no bites on FreeCycle. And on FaceBook, I could not get past the various pop-up privacy statements (which I assume went something like, “Screw you!”) to post anything there. I checked eBay, CraigsList, Parts Select and came up with zip.

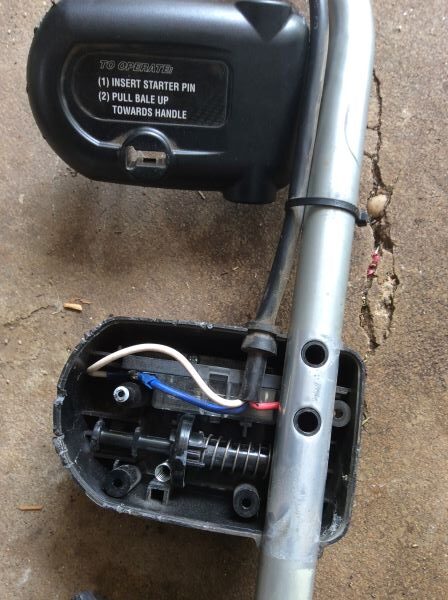
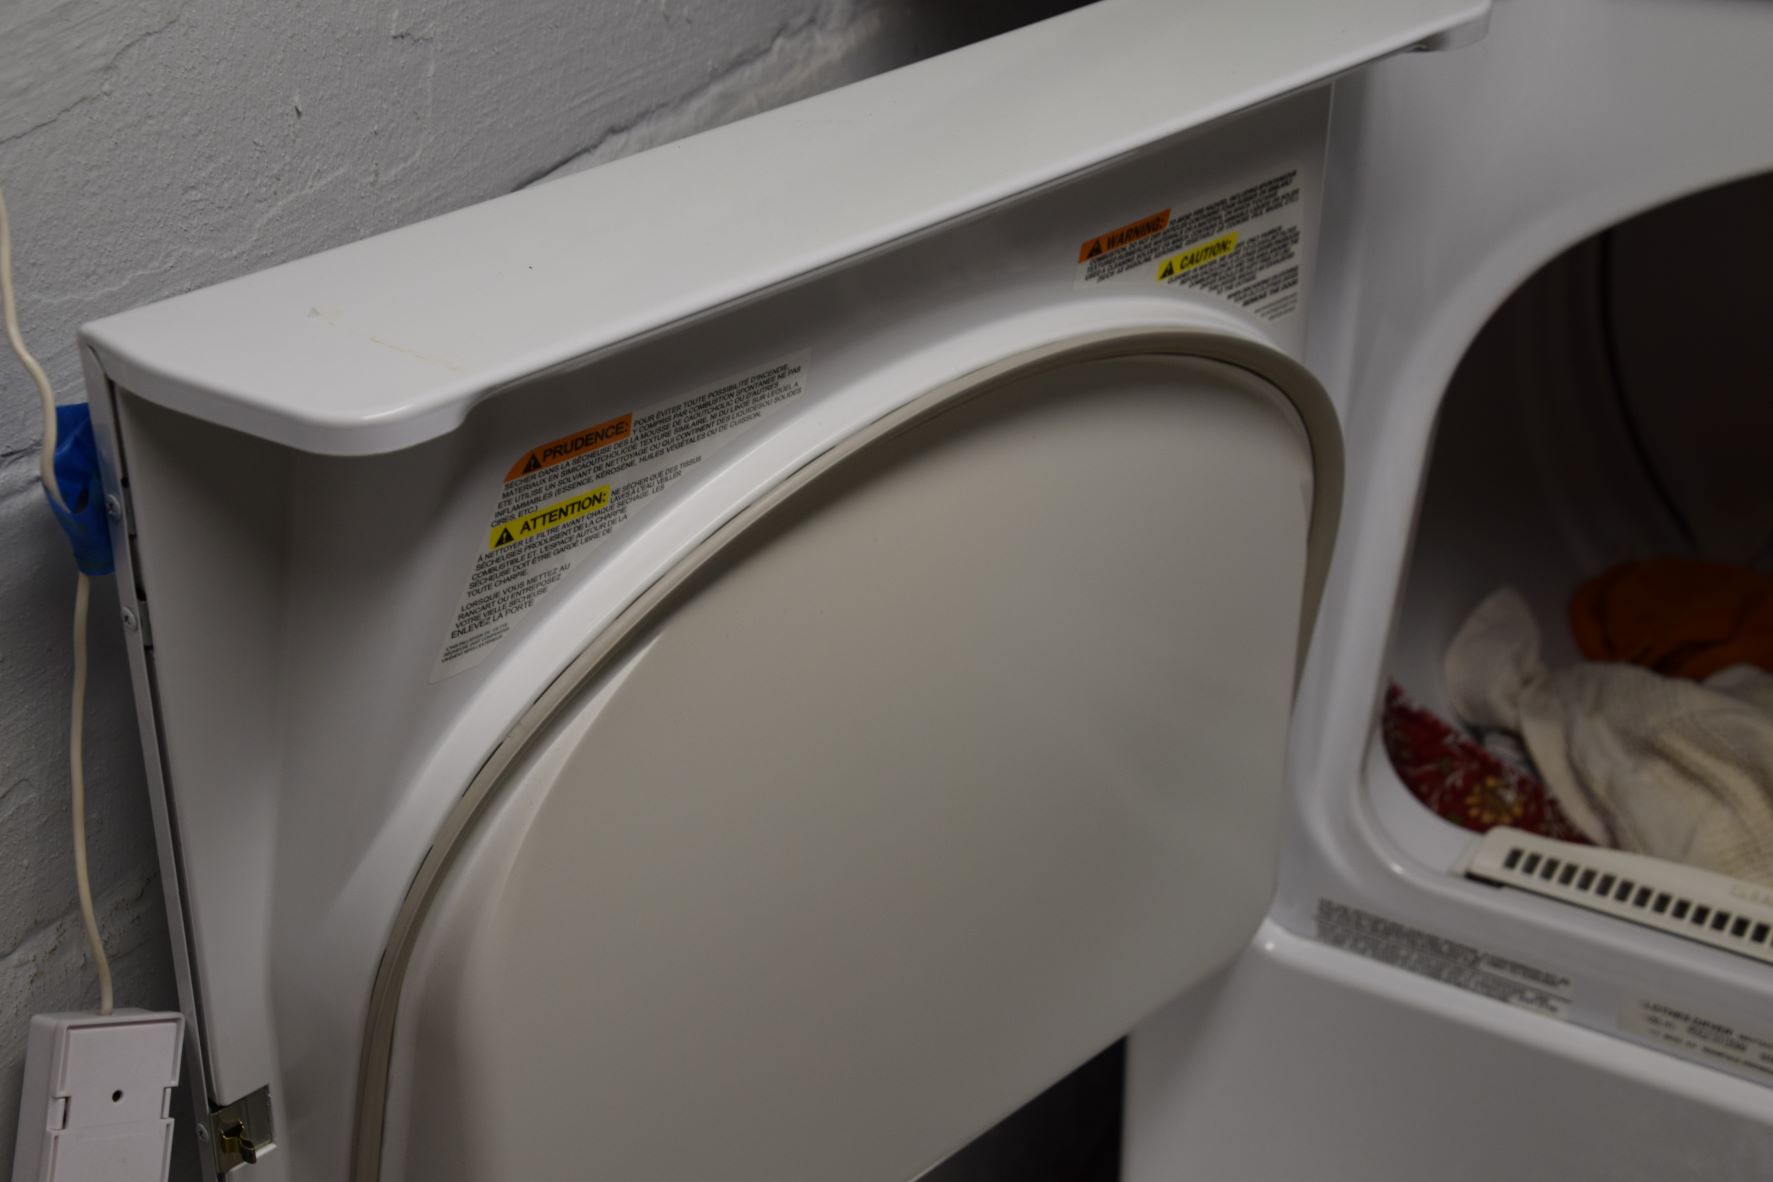
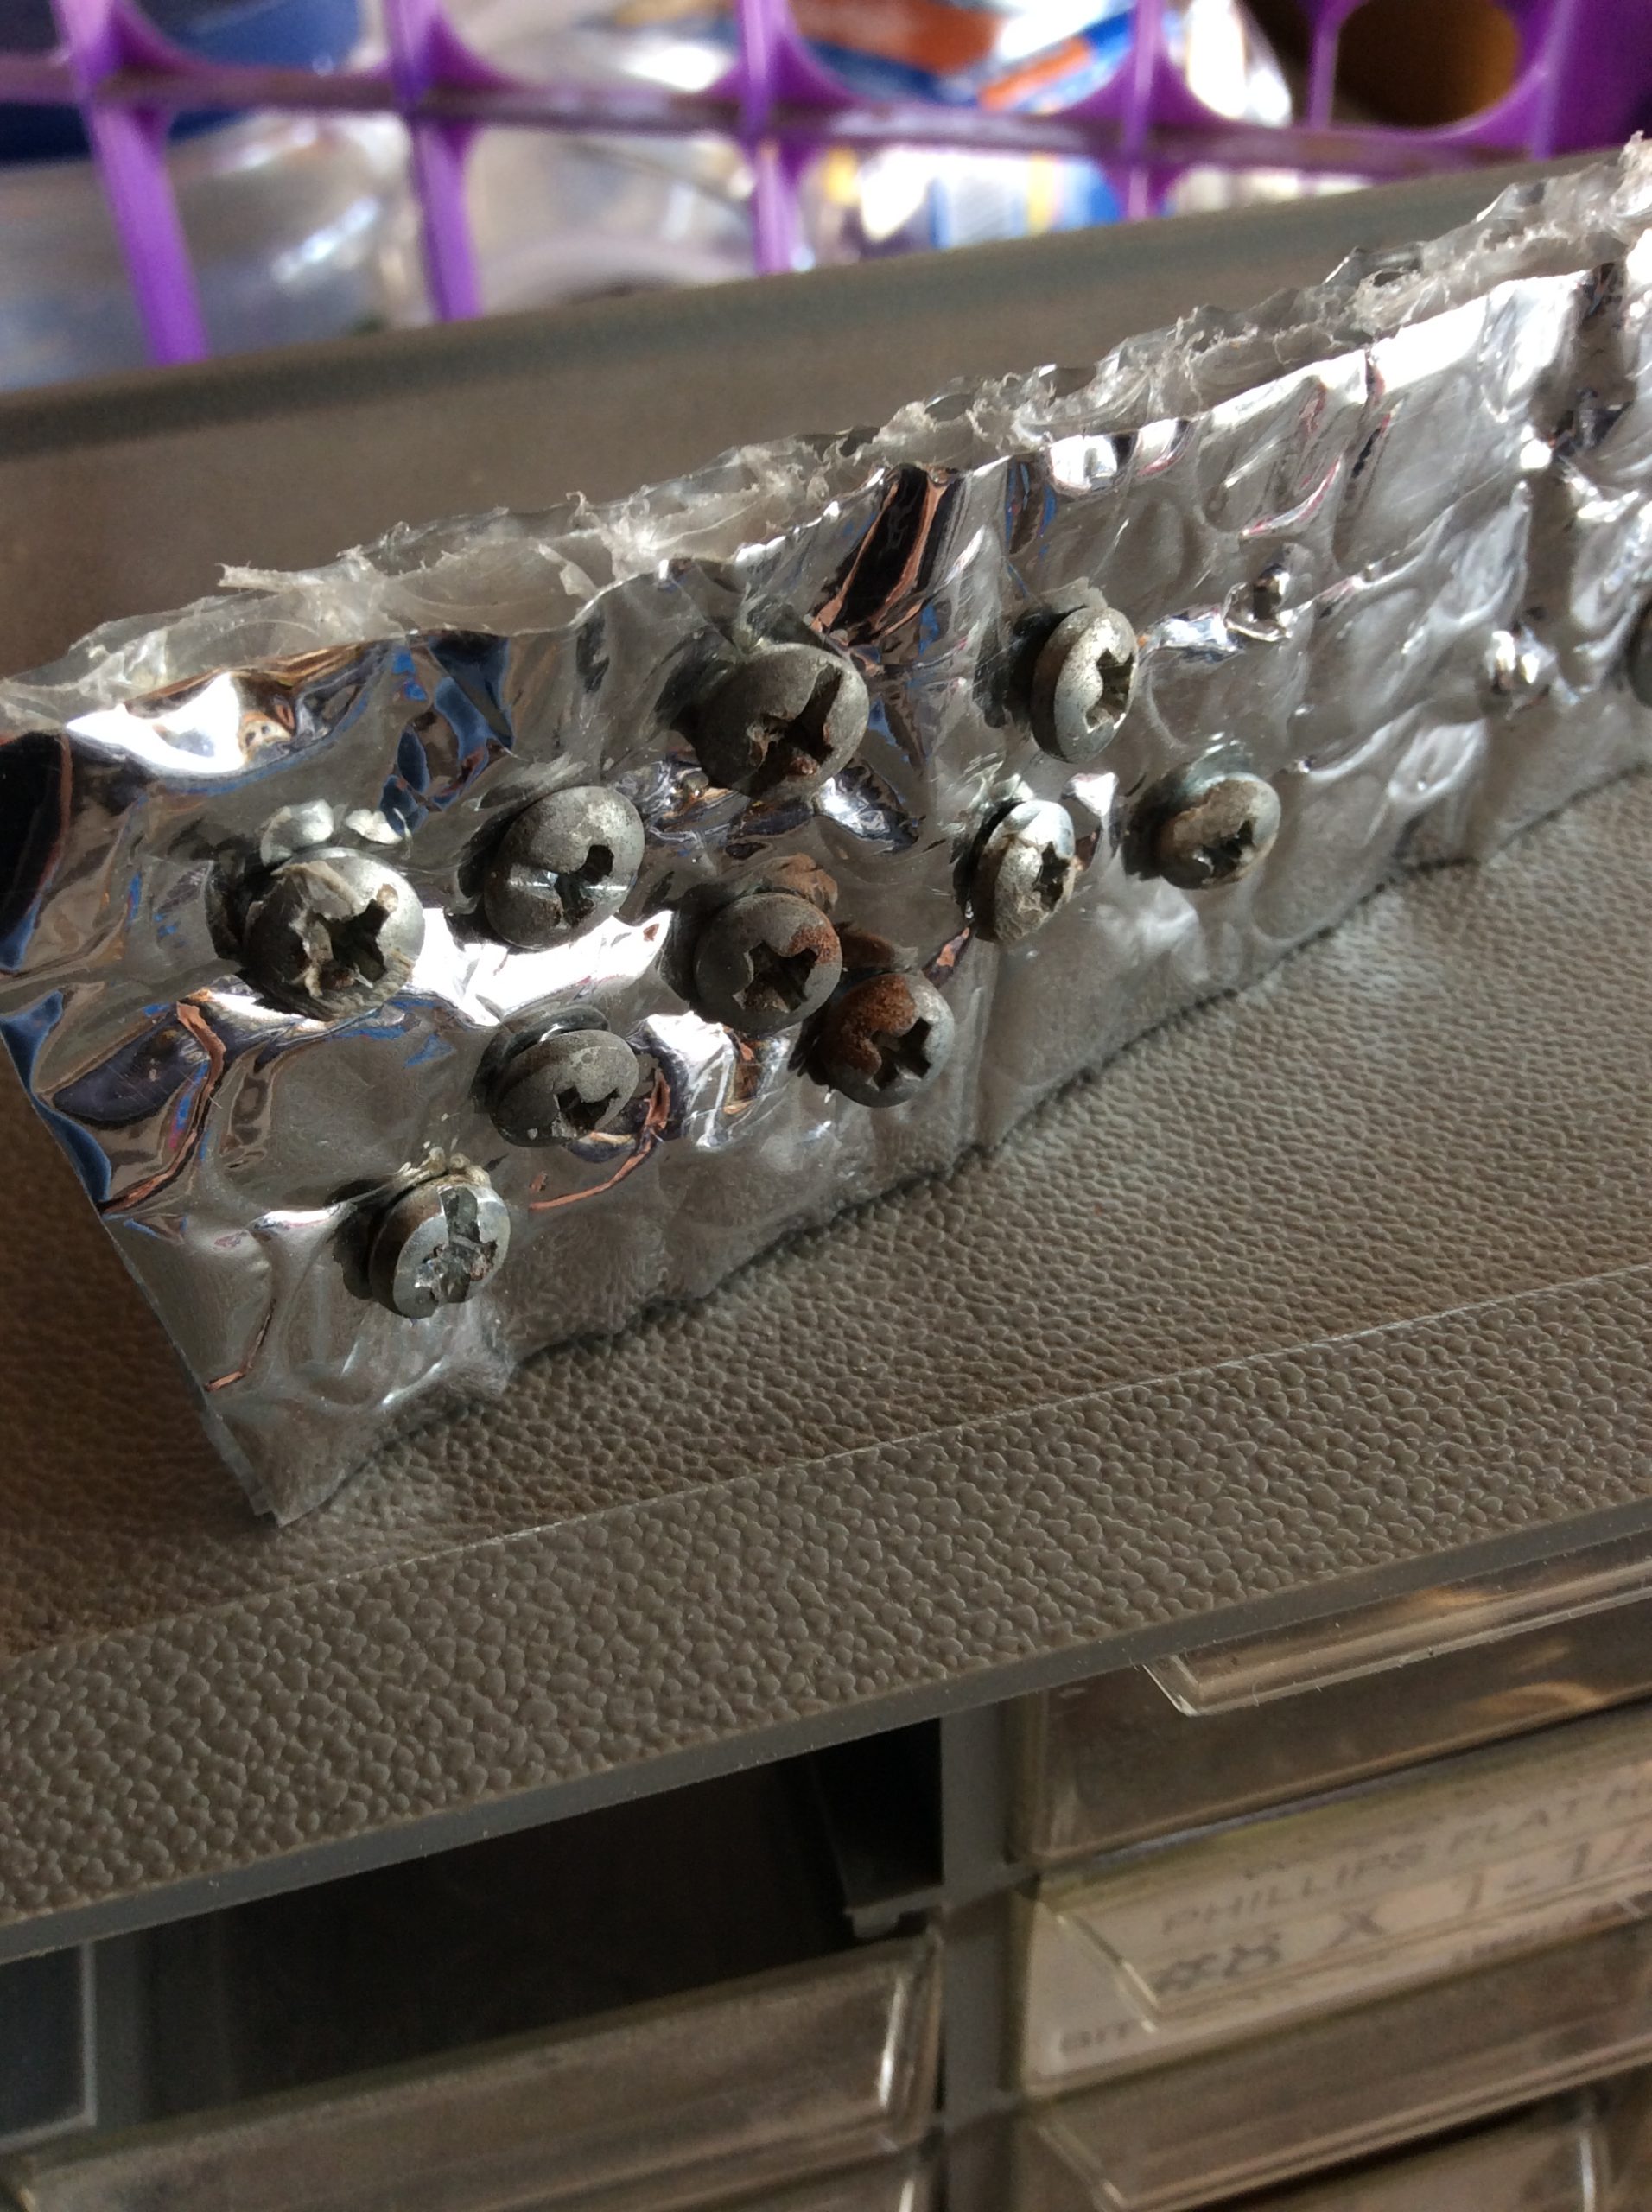
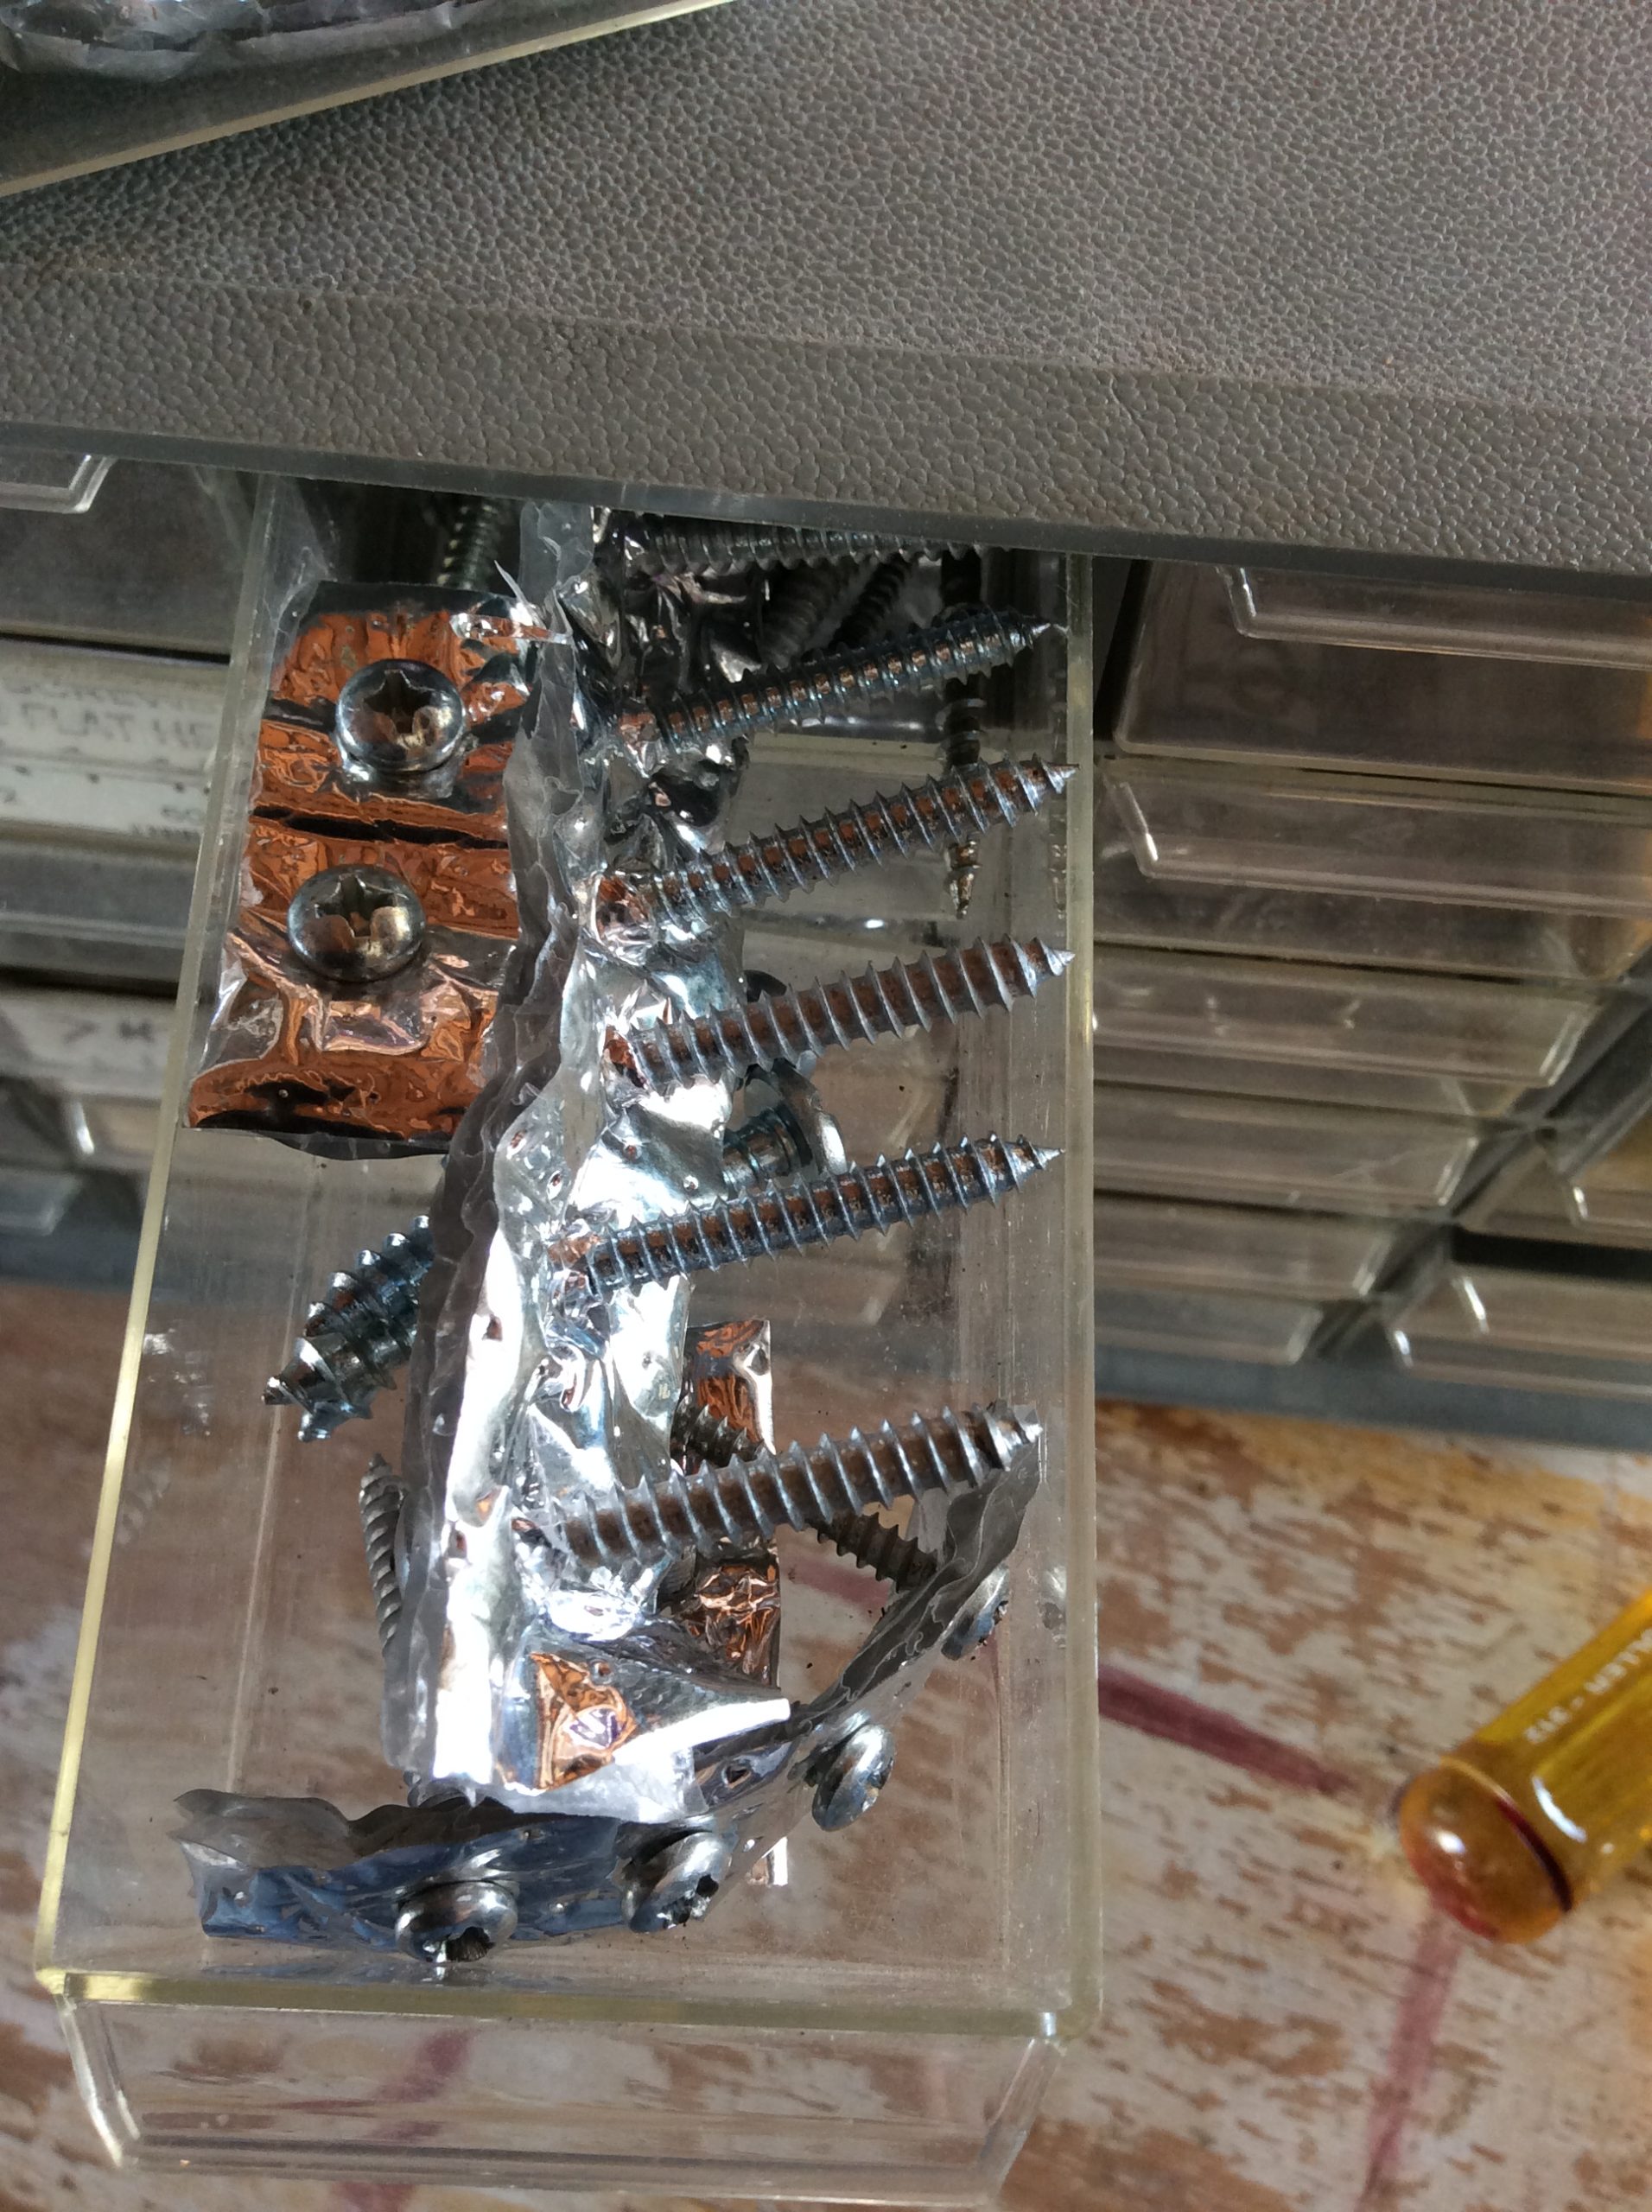
Alternatively, Craig suggested that it might be possible to circumvent the need for a key by adding a toggle switch. He said this like knowing how a light switch works is common knowledge, which made me think that it should be (along with being able to tie a boat to the top of a car and any number of clamping challenges). With instructions to send Craig a picture of the lawn mower so that he could further assess the problem and help me, I went out to the garage with my camera/iPad. And then, seeing the three screws that keep the “key box” together, I became hopeful that a solution would be obvious once I took the thing apart.

Nothing was obvious (including the disassembly). The screws that I removed were deep inside a channel. I worried that it would be impossible to put them back.

Remington lawn mower. Disassembled "key box."
Taking the “key box” apart seemed like a good idea at the time.

After discussing the mower with Brian over lunch, we decided to take it to a repair shop. We were about to load it into the back of my Mazda when inspiration struck. As I was telling Brian about how the key mechanism confused me, it dawned on me how the thing worked. This is not the first time that an answer revealed itself as I tried to explain a problem to Brian. For some reason, just his standing there while I’m fiddling with something can induce insight. Though other times, I need a ton of space to think. It’s on him to know the difference.

At first glance, I couldn’t make sense out of the key mechanism.

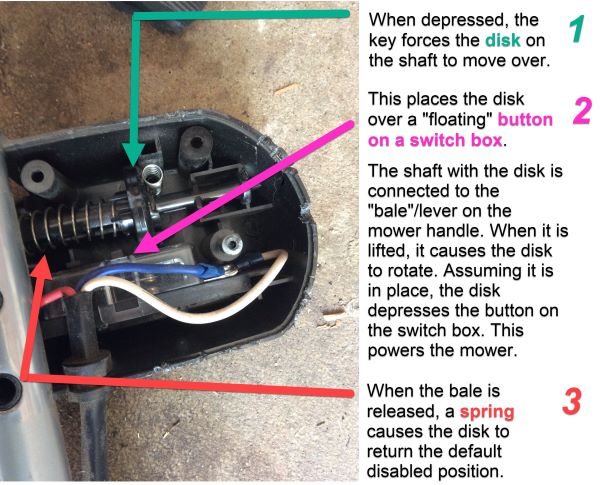
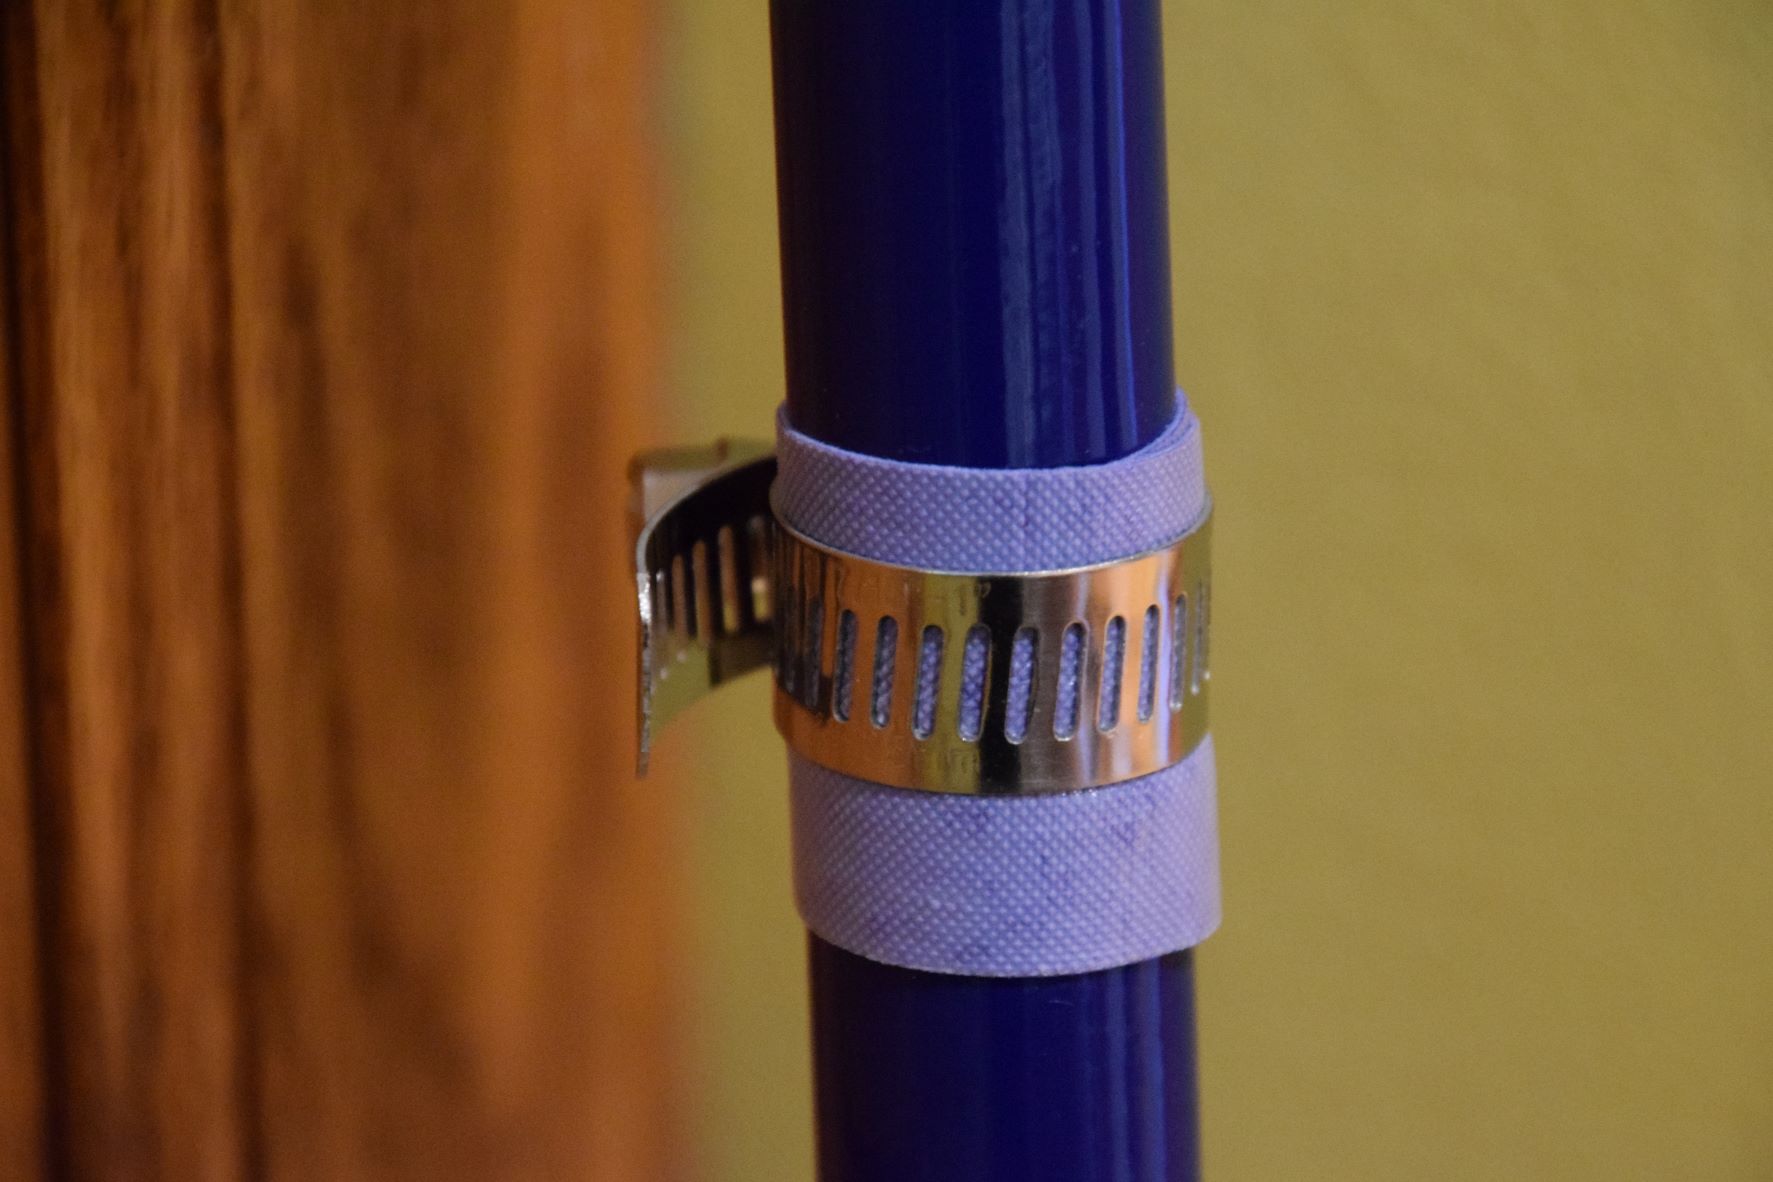
When the key is inserted, its 45° angle at the tip pushes over a disk that is on a shaft with a spring. This places the disk over a button on a switch box. When the lever on the lawn mower handle is pulled up at the same time the key is in place (and the disk is over the button), it makes the disk rotate. This depresses the button on the switch box. I will call this a “floating” button because there must be pressure on it for it to be engaged, as opposed to a button that remains depressed after pressing it. Once the mower starts, the key pops out with the force of a small spring. Sometimes the key pops out with such force that it lands on the ground and if you don’t notice, you might run over it.

Diagram of "key box" of Remington electric lawn mower showing how the starter key works.
It’s clever how the key mechanism in this lawn mower works.

This kind of ingenuity cheers me up. Marvelous, isn’t it? Likewise, the oversight is amusing. Whatever happened to a hole and some string? Why not attach the key to the mower? That way it would be unlikely that a person would ever lose or damage it.

Many of the measurements I took of the key turned out to be unnecessary. However, knowing the rough shape and size of the original key was critical. And I would need to remember that the 45° angle on the key must face the disk. This requirement probably explains the shape of the key that forces it to be inserted in the right direction. Making a new key should be simple. I thought about using wood. Ultimately, I used vinyl. Two layers of tiles with adhesive were rigid and about the perfect thickness. It was also relatively easy to cut with an X-Acto knife, making easy work of any fine tuning that would be needed.

The vinyl pieces I used came to me via FreeCycle.org. I had an idea for how I might use a case of them but then changed my mind. So, I took the tiles to ReStore, which is a second-hand building supply center affiliated with Habitat for Humanity. When I discovered that I had missed a few, it was annoying because it seemed unlikely that I could reunite the spare pieces with the larger group and they were probably useless on their own. And now they were taking up room in my garage. Who knew that I would be making a lawn mower key out of them years later? Or that it would feel like a privilege to have such junk at my disposal? It’s just too bad that it didn’t work.

Getting the disk to line up over the button on the switch box was fussy. I feared that I had messed something up when I took the thing apart (Is this a good time to mention the “spare pieces?”). So, I went inside to watch some YouTube videos about how to install a toggle switch. I had settled on a solution. I would install a big red button on the mower. Huge! And then I would put on a red plastic nose, the big shoes, striped jumpsuit, wig, the works. And then, dressed like a clown, I’d mow the lawn. We would become known as those people who rarely mow the lawn. But when they do, wow. What a show.

And then my dad called.

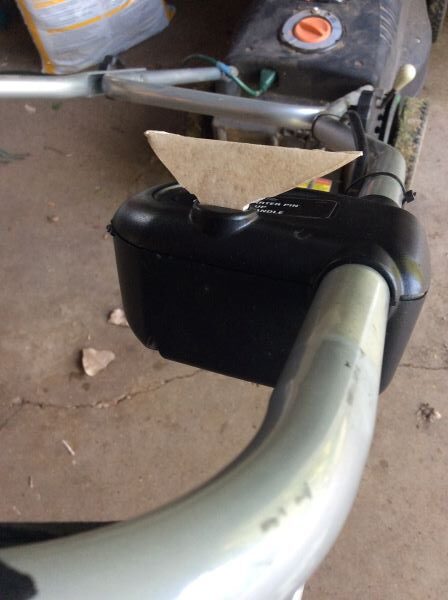
When my mom mentioned the key fiasco — something I must have told her about when I called to celebrate a Timberwolves victory — my dad had some suggestions. And he made me think that I should try my “vinyl key” again, even though it seemed futile. I went back to the garage. This time, instead of trying to hold things together by hand as I tested the key, I enlisted Brian’s help and took the time to screw the “key box” back together. There was no problem getting the screws back into that deep channel where it’s impossible to see. Once inside, the design forces the screw to go in straight (This was not the case with a similar design on a fan I took apart to clean. The channel wasn’t narrow enough to keep the screw straight.) When Brian pulled up on the bale, I was surprised when the mower revved up. We tested it again. Still worked. Again? Still? Brian mowed the yard. No problem. There. I fixed it.

Because the key is a tight fit, it’s permanent; the spring cannot eject it. Should I pull it apart and do some more fine tuning? Maybe. But I’m nervous about fussing with it. Let’s call it done.

Hopefully, we can get another decade out of our mower. After I re-wrap the handle with some leftover tennis racket tape, get the blade sharpened and eventually make one more repair that I’m saving for my friend Craig, it might be possible. After all, my dad is still nursing along his riding lawn mower, which he has had for 35 years.

Lawn Mower with makeshift key made out of vinyl.
Had I realized that this key was going to be “the key,” I might have put a little more thought into the design.

Broken Mop Handle

In yet another installment of “There, I fixed it!” we have a mop handle repair.

The handle came in two pieces that were screwed together with plastic threads on the inside of the rod. At least that’s how I remember it. Initially, I put a Band-Aid on the inside of the wider piece to add some grip and tension. It worked but required periodic attention. I can’t vouch for my current solution. However, five minutes after the repair it’s rock solid. As before, I padded the inside of the wider rod. This time I used a dab of tape that Brian bought for his tennis racket. I tapped the rods into place with a mallet. Then I covered the seam with more tape. Finally, I added a hose clamp. I wanted this mop to know that I meant business!

As with most projects like these, it required a stop at YouTube. While I had the inspiration to use a hose clamp, I didn’t actually know how these clamps worked. Now that I see how turning the screw feeds the band through a slot and tightens it, once again I’m in awe of tools. Sometimes I can be in the garage and screwing two boards together when – for a flash – I’m aware of how amazing it is that we live in a world were there are screws and screw drivers and electric drills… The history of joinery must be fasten-ating!

Fascinating. I never thought of that. To fasten. To fascinate. To hold. To hold one’s attention. To grip. The two words must be related, right?

In other YouTube news, I found instructions for making a jig so that I can make straight and uniform cross cuts with my circular saw. I’ve gotten by in the past but I want to build on my skills and make cleaner more precise cuts. The guy in the video puts the thing together in a few minutes. It took me two days (albeit not full days!) and three trips to the hardware store to get it right. I enjoyed figuring it out. At the same time, these days I feel nagged by other chores and projects that are always lurking in the background. I miss getting lost in a project where nothing else exists.

So, did the jig work. Yes!

As I was assembling, disassembling and reassembling my jig, a scene from Sex in the City kept looping through my head. In it, Miranda who is obviously pregnant is buying a wedding dress. When the store clerk suggests white she says, “The jig is up!” But it’s only now that I’m thinking about what it means. Would you hear “The jig is up!” in a factory. Like “order up”? Then maybe it came to mean that I recognize your pattern (a pattern of deceit?) and you can no longer fool me?

It was a nice theory, but it would appear that I’m wrong. After a quick search, most sources, including a second-hand account of what the OED has to say on the matter, attribute the phrase to an Elizabethan dance, the jig. “The dance is up!” In addition, jig also came to mean a trick or a practical joke. In other words, “The jig is up! Your trick has been exposed!”

Sometimes I think it would be fun to dedicate a YouTube channel to me following the directions for all manner of things I find on other channels. How to make fresh noodles. How to tie a quilt. How to remove a broken screw. But alas, it might lurk in the background along with the garage door that needs painting, the weeds that need pulling, rebooting a podcast that has been dormant, and outlining my next book.

I hope you are amazed by something today. Something simple. At least for a flash. And I hope that whatever you are doing, you can enjoy it fully. Those other things can wait their turn.

There, I fixed it.

It has been a long time since my friend Paul introduced me to a website that featured DIY plugger repairs. “There, I fixed it,” perfectly summed up the eyeglasses that were held together with zip ties or the mirror that was taped to a car. My latest low-budget solution indeed made me yell those words out loud. I solved a problem that had arose from the solution for a different problem, which in turn gave me an idea for a future episode of my long-dormant podcast, QuOTeD – The Question of the Day.

It only took 14 years of living in this house to realize that the door on the dryer is reversible. Making the switch would mean that I could transfer clothes from the washer to the dryer without the door blocking me. However, one improvement exposed the need for another one. The dryer isn’t level. Now the door swings closed from a resting state. It might be worse than the original problem was. The solution is to level the dryer. But until I get around to it, I’m using a magnet to hold the door open. It’s taped to a random wire that will be removed – again – when I get to it.

Hold dryer door open with magnet.
There’s a magnet buried in the blue tape.

In more fix-it news, I made some updates to the various websites that I manage. Had I been pinged by the social scientists who are collecting happiness data, it would have been a low point for me. But I don’t think it was the task itself that I hated. It was having to do it instead of something else. In fact, I might have preferred to troubleshoot websites over putting up the apples from my neighbor’s tree. In this case, any unhappiness I might have been feeling didn’t stem from a specific task, annoying that it might have been. But it was about the perceived or real pressure to do more than can be done in a day. I suppose one lesson here is to ignore the dire messages to make software upgrades until you can put it on the schedule. In the meantime, find your happiness in crossing your fingers and trusting that it’ll be fine.

Taking a walk this morning, Brian and I stumbled upon another swell fix-it job.

Cheap landlord or ingenious solution?

It’s nice when things fix themselves. I was late planting my garden this spring and on top of that, it appeared that I had planted some non-producing beans – if that’s such a thing. But then one day I was working in my yard and saw green beans hanging from the top of the arbor.

Nature doing its thing.

I wish the environment could fix itself on a timeline conducive to supporting life as we know it. Regardless, I’m still heartened by the bees that make the yard hum.

Bees go wild for the chives and sedum that line the back walk.
Chives and sedum make a pretty mix.

If only I would fix the compost, maybe Brian wouldn’t cringe whenever I hand him a bucket to empty. It’s pretty wild back there.

Can you spot the compost bin in this jungle?
You’ll have to fight the raspberries to get to it!

There’s a lot yet to fix around here. But it’s important to remember to stop and take pictures of the flowers.

As for my question, given that it took me over a decade to make a simple improvement – reversing the swing on the dryer door – I’m wondering if others have such projects. Are there easy home improvements or repairs that you put off doing until, for reasons you might not fully understand, you woke up and decided today is the day. You tackle a task only to wonder: What took me so long?

Organizing Screws, Nails, etc.

In the summer of 2020, I spent some time organizing the garage. This included facing the yogurt containers full of miscellaneous screws, nails, paperclips and the random cafe curtain ring. It was a tiresome task that used up my allotment of decision-making power for the day. Nevertheless, it felt good to do it. Tidying up always gives me a sense of accomplishment. And it’s particularly satisfying when I can benefit from my effort down the road, as I recently did.

I was, once again, organizing the garage and needed some really short screws that could be used to attach container lids to the bottom of a shelf. At first, it was looking like a trip to the hardware store was in order. But then I remembered that not only did I save some random screws, I organized them in such a way that they could be useful.

In one case, I used scraps of foil insulation to further divide the drawers in the hardware organizer that I was using. Other materials like a piece of thin cardboard would also work. Take a strip that is the width of and a bit longer than the drawer. Make a crease for however many dividers you want, being careful that the resulting divider doesn’t exceed the height of the drawer. Pinch. Staple. Insert.

Here’s a picture where you can see how two different types of nails are separated within the same drawer:

In another case, where I had a handful of onesies and twosies, I punched the screws through a scrap of foil insulation. This keeps them together nicely.

Then you can just put these little sheet of screws in a drawer:

As for why I wanted to screw container lids to the bottom of a shelf: more storage.

Ironically, as I was tidying up this year, I found three – count ’em! three! – yogurt containers full of random hardware.

Ugh!

Kitchen Storage Solutions

I can’t believe I’m going to share a picture of my kitchen drawer with you, but whenever I come across an organizing tip that actually works, it’s hard to resist sharing the news. My sister gave me the idea, which she got from a book about organizing your stuff. I think it might have been The life-changing magic of tidying up by Marie Kondō.

Downsizing and organizing seem to be popular themes these days. For the past month, I’ve been watching my recently retired neighbor hall things from her basement to either the trash or a pile destined for Goodwill. On the other side of me a neighbor unloaded some tomato cages, two of which I gladly took. There are entire podcasts devoted to convincing you to get rid of stuff.

Generally, the rule here is “Don’t let it in the house.” But swept up in the celebration of the team’s new logo, I caved and took a free Timberwolves t-shirt that was shoved into my hands on the way out of the arena. It wasn’t a good color for me. I didn’t like the cut. Was it supposed to be a souvenir? Fortunately I have some neighbors who are Wolves fans and they were happy to take the shirt and some other souvenirs. Basically we’re just trading stuff over here.

Another trick is to “Use things up.” When you get that candle on Christmas Day, get the matches out. Light it. Enjoy it every day until it’s gone. If you save it, pretty soon you’ll have two candles and then three. People will get the idea that you collect candles. Then you’ll get even more until you won’t live long enough to burn them all. So use the lotion. Eat the candy. Drink the wine. If it’s not for you, give it away right away. I mean, nobody wants a box of half eaten candies or a candle that was lit once and then stored where it collected dust until it came time for your estate sale.

For the stuff you do keep. Put it away. Even if it’s ultimately a contained mess like my kitchen drawer with the food storage containers, having a place to put things is a start. Until recently, I saw no reason to improve this isolated chaos. It was easy to toss things in willy-nilly and not such a big deal to fish things out as needed.

But when my sister mentioned this storage method where you store things vertically, I wondered if would work for this drawer. I arranged things and it worked great. The real test would be whether the system could more or less maintain itself. After having used this organizing tip for several months now, I’m hooked. It works for socks. It works for t-shirts (should you collect too many freebies). Towels. It works great. It also indicates when it’s time to recycle deli containers I might save. If it doesn’t fit, it’s out. Not wedged in. Not off into an auxiliary storage area. Out.

So here you have it folks.

My kitchen drawer.

Kitchen Storage

My kitchen drawer. The container lids are stacked vertically in a shoe box.

Getting More Space Out of Your Kitchen With What You Already Have

Lid Storage

I thought, “When I’m 90 it’s not going to be so easy to fish out these pans and lids from a cramped lower cabinet.” Then I realized that it’s driving me nuts now! So I removed some minor irritations by using certain spaces and some objects in unconventional ways.

Kitchen Storage

Pan lids are stored by maximizing underused space at the top of the stairway to the basement.

Pan lids are within easy reach, hanging just around the corner from the kitchen at the top of the stairway to the basement. Some lids hang on picture hanger screws. Others are resting on a two-dollar thrift store find, a rack we were using for mail.

Kitchen Storage

The ledge along the staircase keeps the lids out of the way.

The ledge along the staircase gives enough clearance so that the lids don’t obstruct the path or make it likely that they’ll get bumped.

Storage for pans, spices, paper towels, potatoes, onions, garlic…

yyyyy

A shoe rack used to hold pans.

Commonly used pans are where I can easily grab them.

Pans on shoe rack.

Pans on shoe rack.

In addition to saucepans, the shoe rack can hold often-used spices, a bowl for garlic (we’re out of garlic, it’s the blue and white bowl) and paper towels. More pans hang on the wall and sit on top of the radiator below. Baskets hang from a plant hanger and hold potatoes and onions.

Where do you put a kitchen utensil holder, knives and cutting boards when there is no counter space?

Getting around limited counter space.

Getting around limited counter space.

Storing the kitchen utensil holder in the cabinet freed up precious counter space. With open wall space also scarce, it’s a good solution for us. I also liked using what we already had. Brian’s Red Sox bucket was nice and roomy and lightweight. So instead of getting stored and forgotten as many souvenirs do, we get to enjoy it every time we reach for a wooden spoon!

Related to this, I have a friend who stores her cups and glasses in a drawer. When her kids were little she wanted them to be able to reach them so they could help unload the dishwasher. The point is, you can do what you want. Make it work for you. For me, I see the kitchen as a workshop.

Getting more room out of the pantry for canned goods

Canned goods storage.

Canned goods storage.

Putting canned goods on a sloping rack made the bottom shelf of the pantry more functional. I can see everything at a glance. I got the idea from another blogger (I’m sorry, I don’t recall which one) and it works great!

What’s next for my kitchen?

Painting – I’ve been painting the house and the kitchen will be included in this. Now that I’m mostly done with the basement and the living room, the dining room is next. Once that’s done, the color consultant will come back to help me with the kitchen.

New Counter Tops – Right now we have tile on the counter tops. I dream of grout-free counters.

Floors – The wood floors throughout the first floor of the house need to be refinished. I’m not sure when we’ll get to this, but that’s the plan.

Island – I can get more space with an island that can be rolled from in front of the dishwasher, where it would normally live. The extra prep space would be dreamy. I saw a good example of what I want at the Black Sheep, a pizza place in downtown St. Paul.

Medicine Cabinet Storage Tricks

Storing pharmaceuticals.

Office storage solutions for sorting cough drops and Band-Aids?

There was a website I needed to finish. Then there were raspberries to preserve before a quick trip to Rapid City. Oh, and what to do with the tomatoes? I couldn’t get everything done that I like to do before a trip – mainly cleaning the house. I didn’t sit down at 3 o’clock for a break as planned. Instead, I checked things off the list until the garage door shut and we sat in the alley debating whether to take a bucket of worms from my vermiculture system home for the nephews to see. I would have to find another way to be the fun aunt.

It turns out that wrapping kids up in a blanket and swinging them as if they were in a hammock (Hey! We forgot to say

One for the Money
Two for the Show
Three to Get Ready and
Four to Let Go!

)

or dragging them chariot-style across the lawn was probably more fun than red wigglers. Until Sioux Falls, I was certain that I would regret leaving them behind; I never did.

In the alley we also considered our route and made guesses as to which was least likely to be choking with straggling rush hour traffic. We sailed west on I-94 for about a minute and 20 seconds before I hit the breaks. It was stop-and-go until south of the suburbs.

Brian has never understood why thoroughly cleaning the house is part of the ritual of hitting the road and from what I can tell from the comedy channels on my Internet radio, he’s not alone (and neither am I!). While I thought this was about the simple pleasure of coming home to a clean house, I’m just realizing that it’s also about the surprise and the feeling of being cared for. While keeping a clean house is an excellent way to care for yourself (or someone you love*), it can be a grind. The laundry is done until I change my underwear. And by the time I’ve dusted a bobble head (ahem) in one room, a spider has begun reconstruction in the next. There is rarely enough time or the distance to enjoy the results of my labor. But if I change the sheets before getting out of town, when I come home not only will there be fresh linens to enjoy, there will be the perception that someone else made the bed (or vacuumed the staircase, or polished the baseboards, or shined the mirror, or washed the windows)…for me.

And then there are those household organizational tricks that you can keep rediscovering because they maintain themselves. For example, pictured here is another use for a desktop storage container, which has the prestigious honor of having not only been spared the Goodwill pile but of being something I did “find a use for someday.” The open bags of cough drops and the flimsy boxes of Band-Aids and other odds and ends that can clutter up the medicine cabinet were driving me nuts. This was a perfect solution. The clear containers make it easy to see what’s what and the rotating base maximizes the corners of closet shelves without compromising easy access. For better visibility, tear off and date the box covers to use for labeling the containers.

Clear containers lets you see what's inside.

Clear containers let you see what’s inside.

A rotating base maximizes closet corners.

A rotating base maximizes closet corners.

*There are many stories I could tell about helping people clean and getting help cleaning my house. Right now I am thinking of Dawn who had the good sense to make me wash the dishes after my dinner party, a distraction from an upsetting breakup. Late into the night, everyone except for Dawn started to file out. She stayed behind to help with the dishes, which was the last thing I wanted to do. I told her that I would take care of it in the morning; I wanted to go to bed. She would have none of it. In my depressed state, she feared that waking up to a mess would send me over the edge. So, she washed and I dried -or the other way around- until everything was in its place.

Painting the Basement – Part 1

Painting the Basement – Part 2

A few years ago rainwater got into our basement and damaged a finished bedroom there. To address the source of the problem, I spent a summer fiddling with the grading on the side of the house. This year, with the help of a friend who showed me how easy it was to do, I repaired the the mortar of the cement block walls before applying Drylok. Then, we replaced the old fiberglass batting with a rigid Styrofoam product, bringing the insulation up to code. We had considered using a two-part spray foam because we were under the impression that it is the best product available. However, after reading about some negative experiences people had with chemical sensitivities that caused headaches and, in extreme cases, made homes uninhabitable, we decided it wasn’t for us. The decision saved us the hassle of boarding our cat at a friend’s house while the work was in progress. The contractors assured us that it wouldn’t be necessary to do this. However, our veterinarian disagreed.

We also took the opportunity to insulate the rim joists with foam boards that are held in place with a one-part spray foam. This had been on the to-do list ever since our first energy audit in ’08. The work required taking some panels out of the drop ceiling and moving everything out from the walls. Result? Boxes of books all over the house. I’m anxious to unpack! However, with the basement largely dismantled, I thought it would be a good time to paint.

The Internet is full of tips for choosing a color for a basement. The short answer for our situation (not a ton of natural light, adequate recessed lighting) was to stay away from pastels. They can look drab without enough light to reflect. Also recommended was a saturated color that doesn’t have too much black in it. After a few false starts, we settled on Behr’s Pure Turquoise.

Here are some pictures so far.

Looking from bedroom to media room.

Looking from bedroom to media room.

Before

Before

A bookshelf will go here. We're going with

A bookshelf will go here. We’re going with “college style” bricks.

I have a fun color picked out for that post.

I have a fun color picked out for that post.

Before

Before

After

After

It's shaping up

It’s shaping up

The left is the trim. The right is the

The left is the trim. The right is the “fun color”.

I want to paint a mural on this door.

I want to paint a mural on this door.

This old laundry cart was inspiring...

This old laundry cart was inspiring…

Update: August 18, 2015

I’m still enjoying working on this project and try to make progress every day – even if it’s just to tidy up or re-position the drop cloths to get ready for the next thing. Here is some evidence of progress.

Painting this post was a treat.

Painting this post was a treat.

I like how this turned out.

I like how this turned out. The ceiling tiles have also been freshened up with paint. It made a big difference in how the room feels.

I used the same blue for the cement blocks that will support shelves for books.

I used the same blue for the cement blocks that will support shelves for books.

I spent the morning getting the shelves ready.

I spent the morning getting the shelves ready.

Update: August 25, 2015

I just got back from Al’s workshop where he made me some pine boxes I wanted to try as supports for my bookshelf project. I love them! I’m excited to see the whole thing come together! My plan is to use a clear shellac on the boxes in contrast to the shelves where I used amber. I’m so glad that I asked for Al’s help as he steered me away from some design flaws and added some really nice finishing touches. For example, notice the edges on the face of the boxes are rounded. I learned a lot and that was fun!

10.5

10.5″ x 7/5″ pine boxes will be used for shelf supports.

Last week my friend Lucie who was escaping the Arizona heat came by for a look at the project. I took her suggestion and went with the dark blue accent color for the wedge that is revealed on the side of the staircase.  I love how it turned out.

No one would ever see the room from this view, but I still like the effect.

No one would ever see the room from this view, but I still like the effect.

I met this little guy when I first got started on the project and didn’t have the heart to dislodge him. I figured he’d eventually move on. But there he is in the same spot by the window.

Spare the spider!

Spare the spider!

Update: November 8, 2015

I’m not sure I would have ever finished painting the “pink room”, had it not been for my mom’s encouragement. Starting with the discovery that paint was coming off of the wall in sheets, that project turned out to be much bigger than I had expected and to some extent out of reach of my particular skills. We hired someone to repair the plaster. Margo Breivik did great work. Then there was the issue of the trim that had several coats of paint and visible drip marks. Too much paint gives a room the “old baggage” feeling, something that Brian and I noticed when we were house hunting. So I scraped. I used chemicals. With the intention of putting a fresh coat of paint on a clean surface, I took the baseboards down to the maple underneath. Then Brian sees the it. He likes it. Now I’m reading about how to finish the trim with a stain and this adds several more steps to the process.

There were external factors too. There always are. At one point I’m staring into the room and telling my mom that I don’t see how it will be possible to finish. She boils it down. Do something every day, big or small, and eventually it will get done. It might be a week from now or years. But, plug away and you will finish. As for the “years” she says, “It’s your house. What’s the hurry? Do what you want.”

The room turned out great. I felt proud when my dad marveled over it. He has high standards. He always does good work.

So, I’ve been plugging away at the painting the basement. There’s much left to do, but I don’t (and never did) have the feeling that will never get done, despite the delays. Here are some highlights.

Stuck on More Color Decisions

For the longest time I was stuck on the idea of making the stairwell two-toned, turquoise on the bottom like the rest of the basement and something brighter on the top near the kitchen. Answer (courtesy of Brian): Use the turquoise on the top and the bottom. It turned out great, but what color for the ledge? You see it there on the left?

Stairwell: Two colors or one?

Keeping it simple was the answer. Using the turquoise on the top and bottom of the stairwell was perfect.

To what level do you want to take it?

“To what level do you want to take it?” is a question I kept hearing from the same handyman who told me that I do not live in the Taj Mahal. When I’m doing the work, asking the question is more about what I’m capable of doing; it’s about my curiosity. “How would that look?” It’s not usually about who’s on the clock. In this case, I was second-guessing the color I picked for the ledge in the stairway. What was underneath the 80 layers of paint? As I was getting ready to go out for lunch with my friend Santwana, I literally dropped what I was doing (applying mascara) to grab a scraper to find out. Sold.

I’m not going to lie. Prepping for this job has been a bitch. To what level do I want to take this? Way beyond whatever a flipper might do.

Other Pressing Things

Then there are just the other things that need to be done by a specific time. This is the beauty (and I really mean it – beauty) of living in a place that has four seasons. There are real deadlines. In this case, there was a deck that was in sore need of staining and food to be harvested.

Behr DeckOver

Day four of deck staining. I still have time to play with recording some things.

Staining the deck

Almost done with the first coat. We painted the cracks with a brush and then rolled the rest.

Staining the deck

Almost done.

acorn squash

I gave away a lot of acorn squash and still have plenty.

Fun Times

Then there is just taking a break.

Fish Fry

We made it to South Dakota for my mom’s birthday, which was celebrated with my brother-in-law’s famous fish fry. I’m still thinking about that food.

And some actual progress…

Finishing the 12-foot pine boards for the bookshelf I’m making was definitely progress. I applied four coats of shellac and by the end it got a little tedious. It was worth it. In addition to moving a step closer to completing the project, I opened up a parking stall in the garage. And that puts me back in compliance with my rule to always keep the garage clutter-free enough to keep our cars in it. I’m not sure such a rule is necessary. We live in Minnesota! Yet I can see that the threat of winter isn’t motivation enough for some people. So, I made a rule in case I was the sort who needed it.

Painting the Basement – Part 2

Homemade Laundry Soap

When I was a young adult, I had friends who were devout Amway distributers. My former church youth counselors, Frank and Mary Ellen, took the vitamins, used the laundry soap and personal care products and they aspired to become Amway Diamonds, which meant a lifetime of financial security. They could retire early.

So it was Mary Ellen who first gave me an education on laundry detergent “filler”. Amway’s product didn’t have it. While somewhat ironic and perhaps true, Mary Ellen the Amway dealer considered commercial laundry soaps to be a total scam where a pound of sawdust was sold with every pound of soap. Since then I have watched boxes of Tide and other brand-name laundry detergents mysteriously shrink by about two thirds.

Non-Toxic Laundry Soap

A Sample of non-toxic laundry soap from a Community POWER recipient

Non-Toxic Laundry Soap

Recipe: Non-Toxic Laundry Soap

Flash forward to a presentation of the 2011 Community POWER grant recipients where I was giving a report on a residential composting initiative I coordinated. There I heard about one project that set out to debunk the more-toxic-more-suds-the-cleaner hoax and taught residents how to economize while reducing their environmental impact by – for one thing – making their own laundry detergent. I went home with a sample of the detergent and I tried it for the first time last week.

Non-Toxic Laundry Soap

This cheese grater did not work very well for cheese. But it worked great for soap.

In the load that I did using the sample, there were a few soap flakes that did not dissolve. It wasn’t the end of the world, but certainly not something you can expect the average person to accept. I’m wondering if this can be resolved when I make a new batch of detergent with more finely grated soap. As I recall from the presentation, any bar of soap will do. However, I’ve noticed that other recipes favor Fels-Naptha soap. I’m going to use what I have.

Here are other recipes for laundry detergent you could try:

Non-Toxic Laundry Soap

Less soap. Less Money. Less Space.

Non-Toxic Laundry Soap

3 TBLS is enough for a large load. Normally I would have used 1 scoop. Either way, if you’re not reading the directions and measuring the soap, you are most likely wasting money.

As a bonus, in addition to using less product (1-3 TBS), the powder fits in less space.

One blogger assures us that the lack of suds you’ll notice when using your homebrew is not a problem. She’s right. In the 1960’s marketers pushed suds as a way to tell that the soap was working. Today, we’re warned that too many suds indicate overuse. In addition, high efficiency washers have created a demand for low-suds products again. Marketing fads can be confusing.

Writer Michael Pollan says “Don’t eat what you see on television.” Given the detergent filler Mary Ellen warned me about 20+ years ago and a deceptive suds campaign that added no value but only aimed to distinguish one product from another one just like it, and given the overall advertising tactics that are turning us into neurotic Lysol junkies, I wonder if we shouldn’t apply that rule to all products advertised on television: Don’t buy them.

I think I’ll try it. 2014. Resolve to be Clean.


Links

The Soap Conflict, Thomas WhiteSide, The New Yorker, 1964.
“As the level of detergent suds in the American kitchen approached the stifling point a counter-movement set in. It started with a detergent called All; Procter & Gamble then put out Dash, with ‘low suds’ & ‘safe suds.’ Were suds good or bad?”

Vintage Commercials

Low Suds

https://www.youtube.com/watch?v=F1YTHr4mTQA

https://www.youtube.com/watch?v=vl7V8DGfGpg

https://www.youtube.com/watch?v=lWgIyywz4cg

Without Bleach or Bluing

With Bleach

Decluttering for the New Year

It's All Too Much, Peter Walsh
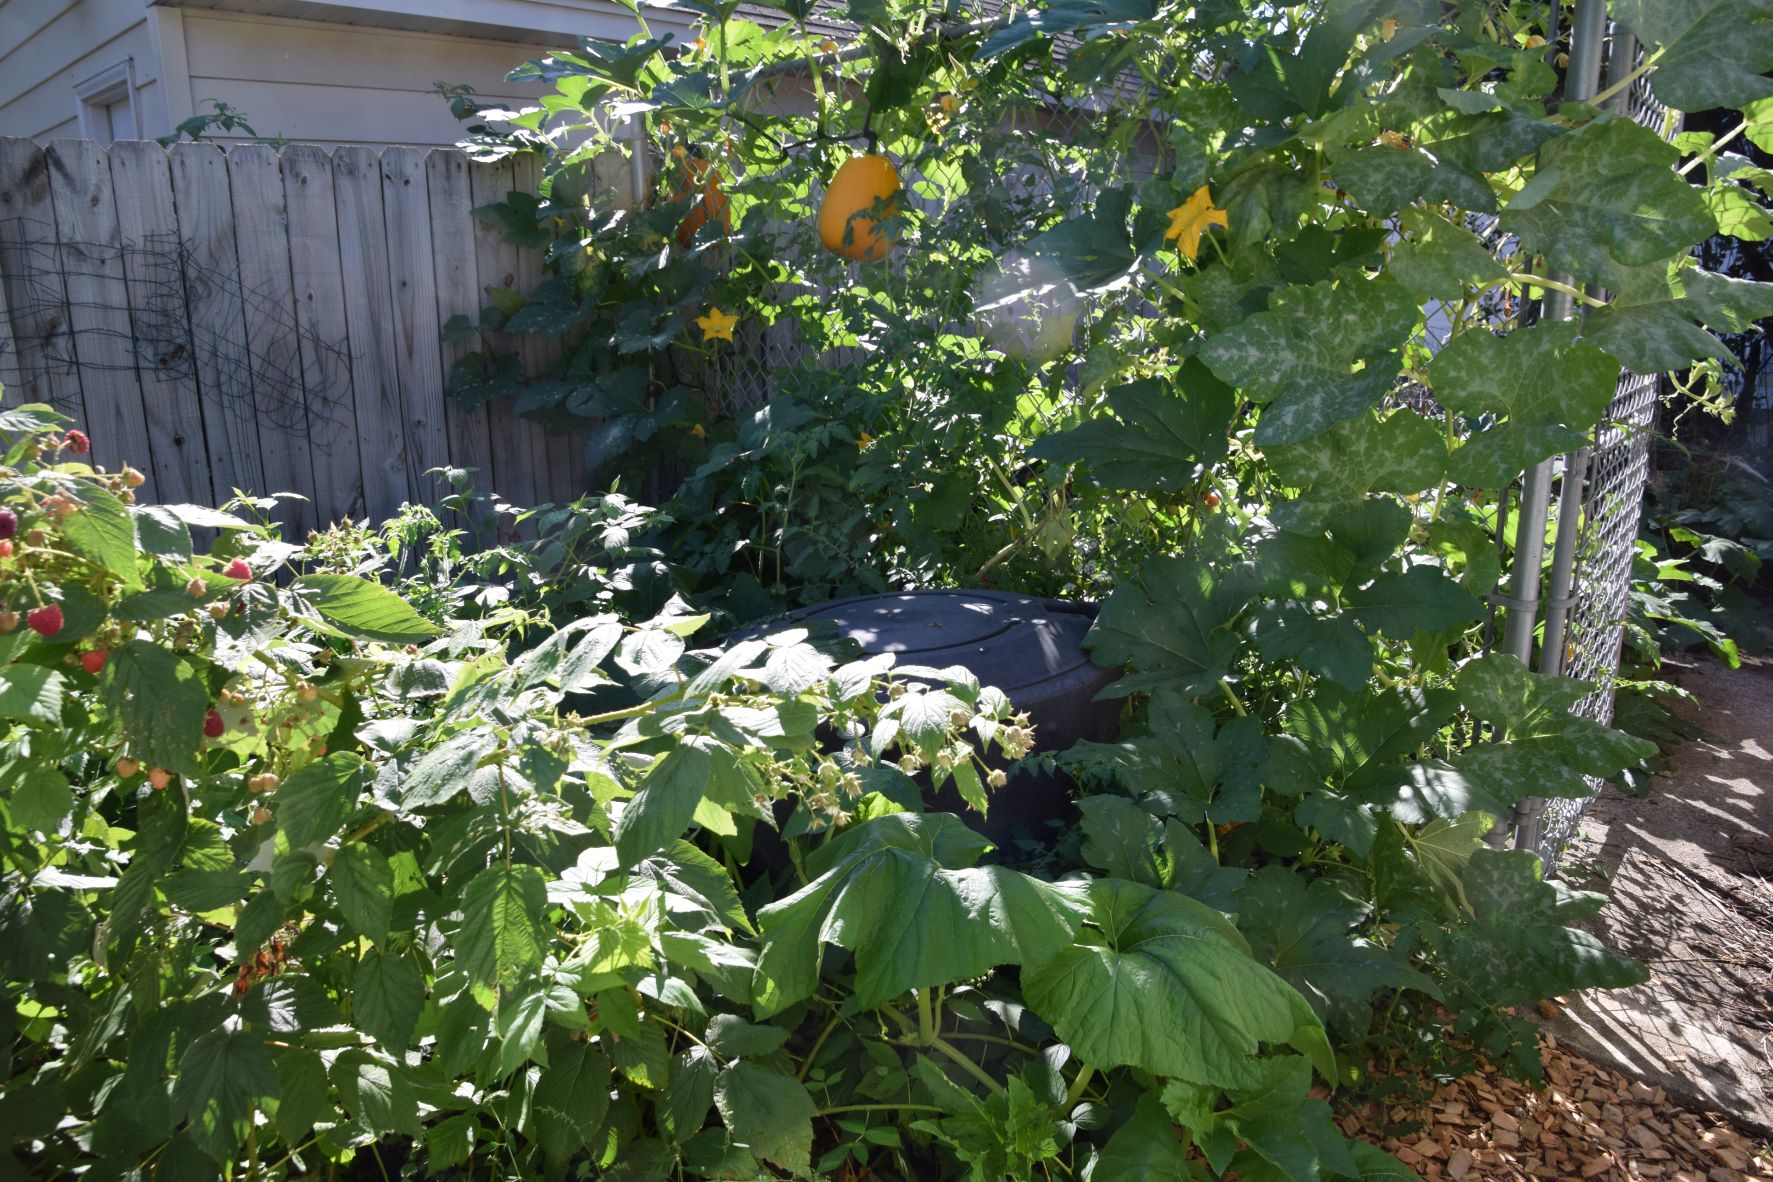
We went to Rapid City for Christmas and, motivated by a book I found while there, I returned ready to take a closer look at our home to see what might be encroaching on our corner of paradise.

Peter Walsh’s workbook, “It’s All Too Much”, begins with an assessment that would suggest that a family intervention isn’t imminent.

“Do you need to clear off the kitchen counter to prepare a meal?”

No.

“Do you regularly misplace your car keys or checkbook?”

No.

“Do you have to remove laundry… to get to your bed?”

Not usually.

Yet there’s a reason why I walked out of Books-A-Million with a receipt. We have kitchen gadgets that we do not use. I couldn’t do my taxes tomorrow without taking a day to gather the necessary papers and I feel daunted by a stash of plastic bags that is ever growing thanks to our newspaper subscription.

I was also drawn to some of the exercises in the book. The “I might need it one day” and the “It’s worth a lot of money” excuses for hanging on to stuff are quickly neutralized. Not being a huge hoarder myself, I was surprised to notice that I relied on some of them. It was liberating to be ready with a sensible response:

“If I can’t use it today, right now, for who I am in the life I am living, I don’t need it.”

As clutter piles up over time it becomes invisible. So, in the “What I see – What I’d like to see” exercise where you note in detail what is in each room, you learn to see again.

The “Room Function Chart” was another eye-opening exercise. Room by room you are to note the current and ideal function of a space. Based on that, you can determine what is needed and what must go. Doing this exercise, I discovered that our office was serving too many functions. I had been struggling to find a credenza/armoire/cabinet with very specific dimensions and features so that we could reduce the footprint of stereo cabinets and whatnot on the crowded floor. But then I realized that if we quit using the office/video-audio studio/guestroom for overflow clothing, there would be ample room to serve these other purposes. As a bonus, the search for furniture that doesn’t exist could finally stop.

We need to live within the space that we have. I have always believed in Rule #1 and for the most part we do okay. We certainly aren’t paying for storage, which was the subject of a sermon at my parents’ church back in Rapid. The preacher said, “We fill our houses to the brim, packing every closet until we can’t get into them anymore. We stuff the attic with things we will soon forget. When that’s full, we move boxes we never unpacked from our last move into the garage. Then we rent climate-controlled storage space. If it weren’t for the bill, we would forget about that too. Why do we need so much stuff?”

Rule #2 prioritizes the use of space. So, not only do we have to live within the space that we have, the space must make it possible to easily do what we want to do. Keeping this in mind, it is suddenly much easier to choose between a few jackets that I never wear and having easy access to my collection of taped interviews.

Shoes

I don’t wear them. They’re out.

While difficult to overcome the temptation to move clutter from one spot to another, I won’t be able to do that now without remembering Rule #3: “One room’s clutter is still another room’s clutter.” So, I have a nice little pile of stuff accumulating for the Goodwill, the used bookstore, and Craig’s List.

As I worked through some very tiring exercises, I thought of friends for whom clutter is a constant issue and considered whether this book might be a nice centerpiece to a support group. It might be. I thought of people who are relocating to warmer climates or with a job and who have no choice but to look at and handle absolutely everything they own. Whether they decide to pack it all up or dispose of certain things in one way or another before loading the truck and moving on to the next chapter, they’ll have to make a lot of decisions. I wonder what I would decide about the shoebox full of dried out pens that occupy prime real estate in my closet.